


Ideal Pet "Fast Fit" Pet Patio Doors 75" - Super Large (White)
Notice
This Item is Out of Stock
Description
The Ideal Pet "Fast Fit" Pet Patio Doors. Would you rather not cut holes in any walls or doors inside your house? Do you have a sliding glass door with aluminum frame leading out to the patio? Then the Perfect Pet Patio Door with all of its customizable options is right for you.
Key Features:
- Available in two finishes: Silver (Mill) or White to match your patio door
- Single Flexible Clear Vinyl Flap
- Single Pane Clear Tempered Glass
- Weather strip for weather-tight seal
- Available for cats and dogs
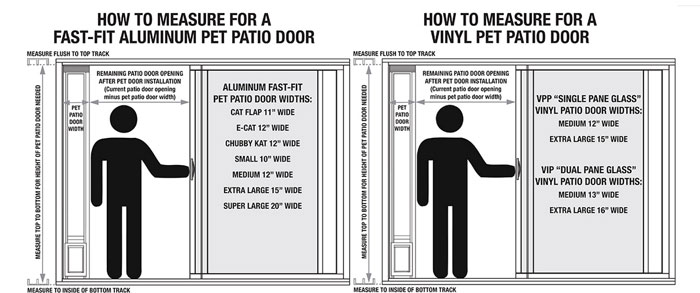
- Measure flush at top track to the inside bottom track of your sliding patio door frame
- Adjustable height for: Standard patio door sizes 77 ?" to 80 ?" (80") Shorty patio door sizes 75" to 77 ¾" (75") or Tall patio door sizes 93 ¾" to 96 ½ (96")
- Standard Pet Door Rise (the distance of the pet door from the floor) on:
- Cat Doors-4"
- Small-2"
- Medium-4"
- Extra Large-8"
- Super Large-8"
If you need to align the sliding door with your patio door, please refer to the manufacturers sliding door adjustment instructions for your brand of sliding patio door.
Useful Information
Download Aluminum Modular Pet Patio Door Instructions
| Standard 80", Shorty 75", Tall 96" | ||||
|---|---|---|---|---|
| Door Size | Flap Size | Silver (Mil) | White Door | Recommended Weight |
| Reg Cat Flap | 6 ¼" x 6 ¼" | PATCFM | PATCFW | 2 - 12 Lbs. |
| ChubbyKat | 7 ½" x 10 ½" | PATCKM | PATCKW | 2 - 25 Lbs. |
| Small | 5" x 7" | PATSM | PATSW | 2 - 12 Lbs. |
| Medium | 7" x 11 ¼" | PATMM | PATMW | 13 - 35 Lbs. |
| Extra Large | 10 ½" x 15" | PATXLM | PATXLW | 36 - 90 Lbs. |
| Super Large | 15" x 20" | PATSLM | PATSLW | 91 - 120 Lbs. |
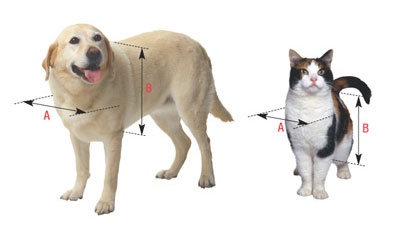
To determine the correct size door simply measure the width and height of your pet:
- Measure the widest point of your pets shoulder to obtain the width measurement.
- Measure from the top of your pets back (just behind his head) to the bottom of chest to obtain the height measurement.
Aluminum Modular Door Assembly Instructions
- Safety Goggles
- Phillips screw driver
Tools Required:
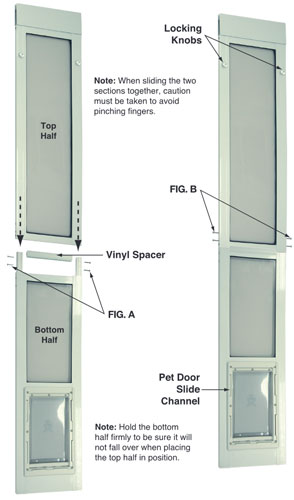
- Remove door top and bottom halves from box.
- Remove 2 left and 2 right side #8 x 1" screws from inserts. See FIG.A.
- Make sure Vinyl Spacer is placed on top of the bottom half, then carefully slide top half (without posts) onto bottom half (with posts).
- Reinstall 2 left and 2 right side #8 x 1" screws and tightly secure with Phillips screw driver See FIG. B.
- Refer to Pet Patio Door Installation Instructions (included), for installing into your Sliding Patio Door.
IMPORTANT: The Locking Knobs at top of door, and the Pet Door Slide Channel, should be facing of house.
Fast Fit™ Panel General Information & Installation Instructions
Fast Fit™ is designed to fit into most sliding patio doors and most sliding screen door openings, measured from inside top track to the inside bottom track. Fast Fit™ Features automatic height adjustment. Panel becomes rigid when knobs located near top of Fast Fit™ are tightened.
Fast Fit™ is designed for easy installation and removal without the use of any tools besides your own two hands and a pair of scissors. For our added protection, a security lock which can be used with or without Fast Fit™ in place has been included. Installation of security lock will require a few basic tools.
- Release automatic height adjustment by turning knobs located near top of panel counter-clockwise. Height adjustment panel should fully extend upward (pull up on panel if necessary).
- Open sliding glass/screen door.
- Insert Fast Fit™ with knobs facing inside. Place top edge into top track of sliding glass/screen door. Lift up and swing lower portion of panel onto ridge in sliding glass door (or screen door.)
- Slide Fast Fit™ against door jamb and make sure that top is fully extended, not tilted to one side, and bottom of panel is on ridge in bottom track (See Figure 1).
- If you need to align your sliding door with your new pet patio door, please refer to the manufacturers sliding door adjustment instructions for our brand od sliding patio door.
- Hand tighten knobs by turning clockwise to lock Fast Fit™ in place. Important: Testing the fit of your Fast Fit™ is imperative. To test fit lift Fast Fit™ upward. If excessive movement is evident, loosen knobs by turning counter-clockwise and pressing in. Adjust as necessary (See Step #4 and repeat).
- To permanently install the Fast Fit™ you may screw through the aluminum fins that protrude on the existing frame of your door. Drill through the fins into the Fast Fit™ (See Figure 2). Two screws in the top and two in the side, approximately 1 ½"-2" from the bottom of door. Do not put any screws into the frame by the glass of the Fast Fit™ as breakage may occur.
- Optional permanent placement for fixed panel sliding door. Remove screws that hold fixed glass panel in place and slide over. Insert the Fast Fit™ panel in space and re-fasten fixed glass panel.
Fast Fit™ Placement

- Release automatic height adjustment by turning both knobs counter-clockwise and pressing in.
- Lifting upward, swing lower portion of panel away from lower track.
Fast Fit™ Panel Removal
- Clean all dirt and grease off edge of surface area.
- Beginning at bottom, attach Fast Fit™ Bumper Seal on the edge of the Fast Fit™ by running Bumper Seal for its entire length and then pressing firmly into place (FIG 3). and removed excess with scissors.
Attaching Fast Fit™ Bumper Seal
The purpose of the Fast Fit™ Bumper Seal is to provide a weather seal and bumper between the edge of Fast Fit™ and your sliding glass door.
- Clean all dirt and grease off edge of surface area.
- Measure the vertical distance, or height of exposed glass, between top and bottom frames of the sliding door.
- Cut Vinyl Draft Seal to size with scissors using measurement from above.
- If necessary, adjust Vinyl Draft Seal width by placing on back edge of sliding glass door. Flexible vinyl on Vinyl Draft Seal should rub lightly against glass. (FIG. 4)
- Starting at top, attach Vinyl Draft Seal by aligning edge so that it rubs lightly against glass. Pull paper off tape and gently press in place while working slowly down the Vinyl Draft Seal. Do not press firmly in the event that repositioning is necessary. Note: Be sure that vinyl rubs lightly against glass all the way down length of glass.
- Press Vinyl Draft Seal firmly in place along entire length when you are satisfied it is correctly place.
Attaching Vinyl Draft Seal
The Vinyl Draft Seal's purpose is to seal the extra air space between your sliding glass door and stationary window created when your Fast Fit™ is in place (FIG. 4)
- With sliding door in closed position (without Fast Fit™), place lock in desired location with bolt in the retracted position, pointed toward the sliding glass door or stationary window rail, leaving approximately ⅛" clearance between bolt tip and aluminum rail (FIG. 5).
- Holding lock firmly in place, mark screw holes and center of bolt in rail of sliding door or stationary window.
- Drill two ⅛" holes for mounting screws and a ⅜" hole for locking bolt. Caution: Do not drill into glass.
- Install Screws. Do not over tighten.
Installing Security Lock (Optional)
Please note: Security Lock is installed on the inside of your house. If your sliding glass door is on the inside of your hose and the stationary glass on the outside, then lock will be installed on the sliding glass. If the stationary glass is on the inside and the sliding glass door on the outside, then the security lock will be installed on the stationary part of our door.
- Close sliding glass door, with trainer on opposite side of door from pet.
- Hold or tape flap in the open position.
- Call or entice pet through pet entry. Do not force pet through door, training may be prolonged as a result of impatience on the part of the trainer.
- Repeat process from the opposite side of pet door panel.
- Call or entice pet through pet entry, but this time hold corner of flap just enough for pet to realize opening exists.
- Repeat sequence again with flap n closed position.
- Once pet has entered, experiencing flap contact, training has been successful. Rewarding or praising your pet after each successful attempt will reinforce use as well as accelerate training time.
Training Your Pet To Use The Fast Fit™ Panel
Customer Reviews
Questions and Answers
 Ideal Pet "Fast Fit" Pet Patio Doors 75" - Medium (White)Reg price: $345.43 Ideal Pet "Fast Fit" Pet Patio Doors 75" - Medium (White)Reg price: $345.43Sale price: $265.71 |  Ideal Pet "Fast Fit" Pet Patio Doors 75" - Extra Large (White)Reg price: $398.91 Ideal Pet "Fast Fit" Pet Patio Doors 75" - Extra Large (White)Reg price: $398.91Sale price: $306.86 |  Ideal Pet "Fast Fit" Pet Patio Doors 80" - Cat Flap Small (White)Reg price: $196.17 Ideal Pet "Fast Fit" Pet Patio Doors 80" - Cat Flap Small (White)Reg price: $196.17Sale price: $150.90 |  Ideal Pet "Fast Fit" Pet Patio Doors 80" - Small (White)Reg price: $196.17 Ideal Pet "Fast Fit" Pet Patio Doors 80" - Small (White)Reg price: $196.17Sale price: $150.90 |