

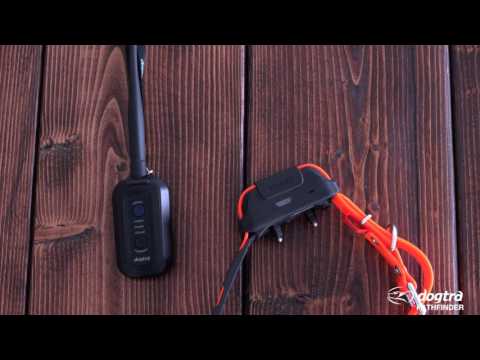
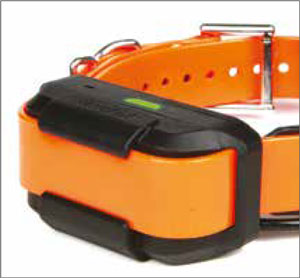
Dogtra Pathfinder Mini GPS Tracking Trainer System 9 Miles
Notice
This Item is Out of Stock
Description
Dogtra Pathfinder Mini brings GPS and e-collar technology right to your smartphone, giving you a more accurate and responsive way to track and train smaller dogs like beagles.
Compatible with and 22% smaller than the Pathfinder, the Pathfinder Mini truly works without using cellular data. Just download the free maps and operate your smartphone in the Off line Maps mode. Unlike other GPS e-collars, there are no extra navigation packages to purchase. The Pathfinder Mini also offers a 4-mile range and a Beacon & Locate LED Light easily track dogs 15 lbs and up.
Key Features:
- Rheostat/Volume Dial with Stimulation Levels 0-100
- 2-Hour Rapid Charge Batteries
- Nick and Constant Stimulation
- Audible Tone
- Fully Waterproof Receiver
- Expandable to 21 Dogs and Hunters
- Geo-fence Option
- Off line Maps
- Precise and Up-to-date Maps
- Tracking Only Mode
- For Dogs as Small as 15 lbs
Package Contents:
- Pathfinder Mini GPS E-Collar
- GPS Connector
- Charger SBC5V2000 5.5
Important Note:
The Dogtra Pathfinder is a track & Train system only! The Geo-fence feature is not a dog containment system and your dog will not receive a correction when leaving a boundary area. The Geo-fence feature only allows you to mark off areas on the map that you do not want your dog to enter and will alert your phone when this happens. Please contact us if you are looking for GPS containment system with track and train features.
Useful Information
View Dogtra Pathfinder Mini Owner's Manual.
UNDERSTANDING YOUR TRAINING SYSTEM
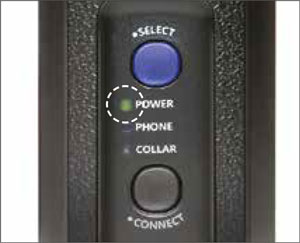
- TURNING THE PATHFINDER ON/OFF
- To turn on the GPS connector, press the blue Select button until the LED turns on.
- To turn off the GPS connector, press the blue Select button until the red LED shows.
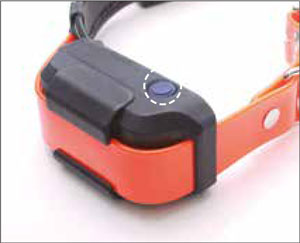
- To turn on the GPS receiver, press the Power button until the LED turns on.
- To turn off the GPS receiver, press the Power button until the LED turns red.
- A tone will play to indicate that the GPS receiver is turning on or shutting down.
- BUTTON FUNCTION
- CHARGING THE PATHFINDER
- Only use official Dogtra chargers with the PATHFINDER.
- Do not charge the PATHFINDER near flammable substances.
- Fully charge the PATHFINDER if storing for 1 month or longer.
- When the LED is red on the GPS connector or GPS receiver.
- When the PATHFINDER app displays a low battery percentage for the GPS connector or GPS receiver.
- When the LED on the transmitter or receiver will not come on.
- When the indicator light turns on momentarily, but will not stay on when the Constant button is pushed.
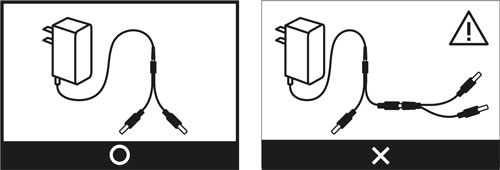
- Connect the charger to the GPS connector and GPS receiver using the splitter cable.
- Plug the charger into a 120-volt outlet.
- When fully charged, detach the cables and plug the rubber caps over the charging ports on the GPS connector and GPS receiver.
- The GPS receiver turns off and cannot be used while charging. The GPS connector functions while being charged. The LED will display red while charging and green when the unit is fully charged. The GPS Connector LED will be green when turned on while charging. A depleted battery requires 3.5 hours to fully charge.
- LED INDICATOR
- PAIRING
- Launch the PATHFINDER app
- Turn on the GPS connector
- In the PATHFINDER app, navigate to Menu → Settings → Bluetooth Pairing
- Set the GPS connector to pairing mode and click 'Start Pairing' in the app
- Once paired, launching the app when the GPS connector is on will automatically connect the phone and connector together.
- The GPS connector should be within Bluetooth range (33 feet) of your phone to operate.
- The GPS connector will reconnect with the phone when it is within range.
- Reinstalling the app will require pairing with the GPS connector.
- The PATHFINDER app may need to be restarted for compatibility issues.
- Pairing Additional GPS Receivers
- Turn the GPS connector on.
- Check that the GPS receiver is turned off.
- Use the Select button on the GPS connector to set the LED to Collar.
- Hold down the Connect button for 5 seconds until the LED blinks rapidly. Release the button.
- Hold down the Power button on the GPS receiver until the LED blinks rapidly and emits three beeps to show it has coded.
- The GPS connector and receiver will return to blinking in normal intervals when pairing is complete.
- ACQUIRING GPS SIGNAL
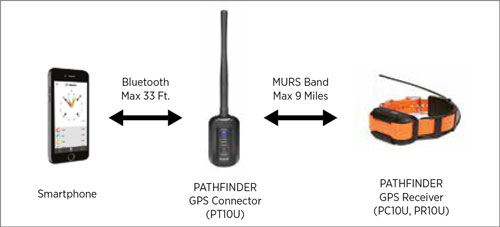
GPS Connector (PT10U)
GPS Receiver (PC10U, PR10U)
GPS Connector (PT10U)
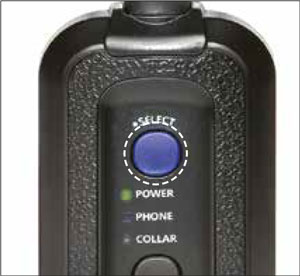
The Select button is used to turn theconnector on/off and select a device topair. While turned on, press the Selectbutton to Phone or Collar to pair theconnector to the respective device.
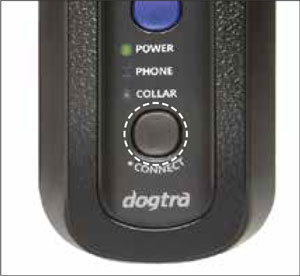
The Connect button is used to connect the GPS connector to a smartphone and GPS receiver. Pairing: Use the Select button to set the GPS connector to Collar to pair the connector with the receiver. Set the GPS connector to Phone to pair the connector to a smartphone.Press and hold down the Connect button until the LED blinks rapidly. The GPS connector will now be ready for pairing.
GPS Receiver (PC10U, PR10U)
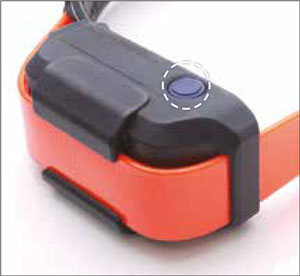
Power On: To turn the GPS receiver on, press the Power button until the green LED turns on.
Power Off: To turn the GPS receiver off, press the Power button until the LED turns off.
Pairing: To place the GPS receiver into pairing mode, begin with the device turned off and hold down the Power button until the LED blinks rapidly. A melody will play when the GPS receiver is in pairing mode.
*The GPS Collar pairing mode is used to pair the GPS receiver and the GPS connector. The PATHFINDER set comes with both parts paired to each other.

Fully charge the PATHFINDER GPS connector and GPS receiver before the first use. The PATHFINDER uses lithium polymer batteries.
When to Charge
How to Charge
Splitter Cable
Do not use more than one splitter cable with a single battery charger.
GPS Connector (PT10U)
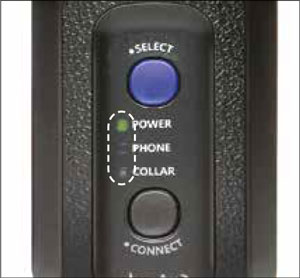
Power: The Power LED blinks every 2 seconds while turned on. The LED colors represents the battery life: Green when 50-100% battery, Orange when 10-50% battery, Red when 0-10% battery.Phone: When turned on, press the Select button to set the GPS connector to Phone. When set to Phone, a green LED will stay on. Hold down the Connect button until the LED blinks rapidly to place the GPS connector into pairing mode.
Receiver: When turned on, press the Select button to set the GPS connector to Collar. When set to Collar, a green LED will stay on. Hold down the Connect button until the LED blinks rapidly to place the GPS connector into pairing mode.
GPS Receiver (PC10U, PR10U)
The LED on the GPS receiver blinks while turned on, and the LED colors represents the battery life: Green when 50-100% battery, Orange when 10-50% battery, Red when 0-10% battery.
PATHFINDER GPS connector connects between your smartphone and PATHFINDER GPS receiver. These devices need to be paired for the PATHFINDER system to work properly.
Pairing a Smartphone to the GPS Connector
Pair the GPS connector and GPS receiver in close proximity to each other. You can use the PATHFINDER app to check if the GPS receiver is properly paired.
The PATHFINDER is meant for use in open outdoor areas. After pairing, take the GPS receiver outdoors to acquire a GPS signal. Once the signal is acquired, the GPS receiver icon will appear on the Map tab of the PATHFINDER app.Operating the PATHFINDER near tall buildings and other steel structures will reduce the range of the GPS signal. Not acquiring a GPS signal for prolonged periods of time while outside may indicate issues with the unit.
CHANGING THE CONTACT POINT LENGTH
The Dogtra PATHFINDER comes equipped with standard ⅝" contact points that can be extended to ¾" contact points, for use on dogs with longer coats. To increase the contact point length from ⅝" to ¾", follow the steps below.
- Using the included adjustment tool with the side marked ⅝", unscrew thecontact points counter-clockwise.
- Place the contact point extension over the exposed threads, flat side down.
- Place the contact points over the extensions and tighten the contactpoints and extensions clockwise using the adjustment tool with theside marked ¾".
Caution:
Tighten until firmly in place. Be careful not to over tighten.To shorten the contact points back to the standard ⅝", start with the adjustment tool with the side marked ¾", remove the contact point extensions, and tighten the contact points with the adjustment tool with the side marked ⅝".
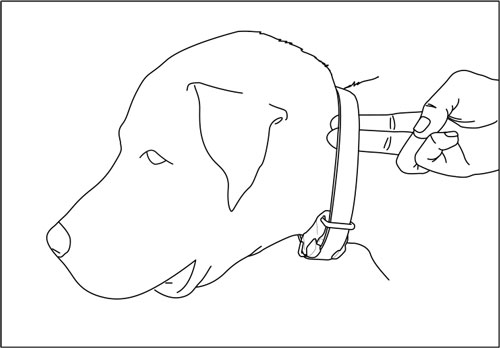
RECEIVER FITTING
Proper Fit
The receiver should be fitted so that the medical grade stainless steel contact points press firmly against the dog's skin. You should be able to fit two fingersunderneath the collar strap. The best location is on either side of the dog's windpipe.
Improper Fit
A loose fit can allow the receiver to move around on the dog's neck. When this happens, the contact points may rub against the skin and cause irritation. If the receiver is too loose, the contact will not be consistent and cause the corrections to be inconsistent. Dogtra uses medical grade stainless steel contact points and anti-microbial plastic to protect the dog's skin.
Attention!
Leaving the receiver in the same location on the dog's neck for an extended period of time can cause skin irritation due to the sensitivity from the contactpoints. If the dog is to wear the receiver for long periods, occasionally reposition the receiver every few hours so that the contact points are moved to a different location on the dog's neck and remove the receiver after 8 hours of usage. Make sure you check for skin irritation each time you use the unit.
FINDING THE RIGHT STIMULATION
- Open the PATHFINDER app to the E-Collar tab and select your dog and stimulation level.
- The stimulation levels are from 1 (lowest) to 100 (highest).
- Always start at the lowest level of stimulation and work your way up.
- The appropriate level can be found when your dog responds to the stimulation with a mild reaction, such as a tensing of the neck muscles.
Note: Every dog has a different tolerance and reaction to the stimulation. Please look at your dog's reaction to find the right level of stimulation. The stimulation level may vary depending on the situation and distractions. A distracted dog will require a higher level of stimulation compared to when there is no distraction.
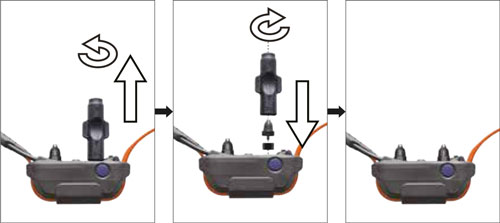
REPLACING THE ANTENNA
For the GPS Connector
- Twist the antenna counter-clockwise to remove.
- Place the new antenna on the bolt and turn clockwise to tighten the antenna.

For the Receiver

Open the antenna enclosure by removing the 4 screws and the contact points. Remove the screw holding the antenna in place to replace the antenna.
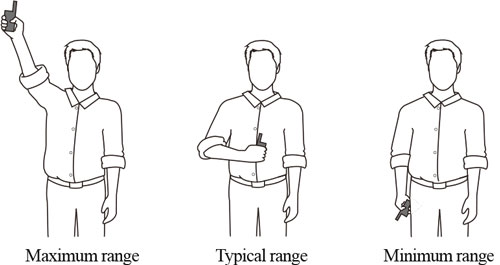
MAXIMIZING THE DISTANCE
- The PATHFINDER has a 9-mile line of sight range.
- To get the greatest range, hold the GPS connector away from your body and avoid touching the antenna.
- Keep your unit properly charged for maximum signal strength.
- The GPS connector device must be near your phone for proper operation, preferably less than 33 feet.
ATTACHING THE BELT CLIP

Follow the instructions below to attach the included belt clip to the GPS connector.
- Align the belt clip to the grooves on the back of the GPS connector.
- With a firm grip, screw on the belt clip's Phillips head screws with a screwdriver.
Caution:
Tighten until firmly in place. Be careful not to over tighten.
USING THE TEST LIGHT
- Turn on the GPS receiver and place the test light over the contact points.
- Press the Nick button in the PATHFINDER app and the test light will light up momentarily.
- Press the Constant button in the PATHFINDER app and the test light will light up as long as the button is pressed, for up to 12 seconds.
- The test light will glow brighter at higher levels of stimulation and dimmer with lower levels.
Note: The test light may not be visible if the intensity level is set below level ten.
Basic Maintenance
- Make sure the rubber charging cap is securely in place on the GPS connector or receiver when in use.
- Carefully inspect the unit for any missing parts or damage to the casing after use. Damaged or broken casing may affect the waterproof guarantee on the unit.
- The antenna must be securely in place for maximum range.
- Charge the unit for 3.5 hours before storing for extended periods.
- Charge the unit fully once a month while in storage or before use.
- Do not keep the unit exposed to extreme climates.
- Dogtra may include updates and improvements to the PATHFINDER app which can be downloaded through the App Store and Google Play.
TROUBLESHOOTING GUIDE
- The dog does not respond to the stimulation.
- Make sure the system is turned on.
- Make sure the strap is on the dog tight enough so that both contact points are touching your dog's skin.
- The contact points may be too short for your dog's thick or long coat. To place an order for longer contact points, please contact Dogtra or a Dogtra dealer. If you are already using longer contact points, you may need to trim the hair on your dog's neck so that both contact points are touching your dog's skin.
- The intensity level may be too low for your dog. Increase the stimulation until your dog responds, usually by a neck movement, head shaking, or looking over the shoulders. The response may be very subtle.
- The LED indicator light comes on, but I do not feel any stimulation.
- Testing the system at various levels using the test light is the best way to test your system. Your tolerance may be higher than the level you are testing yourself.
- The battery may be low. Check the LED indicator lights or the app for battery life.
- The PATHFINDER has no range or the stimulation is weaker when my dog is farther away.
- Check to see if your fingers are touching the antenna as the range may decrease substantially.
- Keep objects away from touching the GPS connector's antenna as the range may decrease substantially.
- The range indicated is for line-of-sight flat terrain. Heavy brush, trees, hills, buildings, and/or moisture will affect the range of your unit. For the best range, hold the GPS connector vertically above your head, and/or try moving to higher ground.
- Any electrical conductors will affect the range, such as cars, chain-link dog runs, metal structures, and radio towers. For the best results, operate away from these structures.
- The GPS connector or receiver is not holding a charge.
- The charging pin may be damaged. A metal pin inside the charging port should stand straight up and firm in the center. If the pin is wobbly, broken or missing, you will need to send the unit in for repair.
- The charging port must be clean prior to charging, clean out any dirt with a cotton swab and some rubbing alcohol. If your dog was in salt-water, be sure to rinse the GPS receiver and charging port with clean water.
- For Dogtra units over two years old from the purchase date, the batteries may need to be replaced. You can replace them yourself by contacting Dogtra for a replacement battery. Damages incurred to the unit due to improper battery installations are not covered under the warranty. Dogtra strongly recommends sending the unit in for inspection and repair.
- My dog has skin irritation.
This may be due to an improper fit or from wearing the receiver too long. If your dog exhibits signs of skin irritation, consult with a veterinarian. Once your dog's skin returns to a normal condition, continue to use the receiver and check your dog's neck each time you use the unit.
Customer Reviews
Questions and Answers
 Dogtra E-FENCE 3500 Wired Fence Collar Containment System 40 AcresReg price: $422.47 Dogtra E-FENCE 3500 Wired Fence Collar Containment System 40 AcresReg price: $422.47Sale price: $324.98 |  Dogtra E-FENCE 3500 Additional Receiver 40 AcresReg price: $190.09 Dogtra E-FENCE 3500 Additional Receiver 40 AcresReg price: $190.09Sale price: $146.23 |  Dogtra Pathfinder Mini Additional Receiver 4 Miles - BlackReg price: $506.97 Dogtra Pathfinder Mini Additional Receiver 4 Miles - BlackReg price: $506.97Sale price: $389.98 |  Dogtra Pathfinder Mini Additional Receiver 4 Miles - OrangeReg price: $506.97 Dogtra Pathfinder Mini Additional Receiver 4 Miles - OrangeReg price: $506.97Sale price: $389.98 |