


Dogtra 1902S E-Collar Remote Training System 3/4 Mile - 2 Dog
Notice
This Item is Out of Stock
Description
Dogtra 1902S is a durable remote e-collar you can rely on for your 20 pound and up dog training needs. With 127 levels of stimulation this low to high output model is great from gentle temperament dogs to the most stubborn dogs. The seamless design offers a modern appearance and comfort for your dog. The 1902S is fully waterproof and has a 3/4 mile range. It's easy to understand why this dependable model is a favorite with amateurs to professional trainers and used for basic obedience for companion dogs as well as hunting, competitive dogs and K-9 professionals.
Key Features:
- ¾-Mile Range
- High Output receiver
- Nick/Constant Stimulation & HPP (High Performance Pager) Vibration
- For Dogs as Small as 35 lbs
- 127 Stimulation Levels/Rheostat Dial/LCD Screen
- IPX9K Waterproof
- 5/8" Enhanced Contact Points
- Ergonomic Slim Receiver Design
- 2-Hour Rapid Charge Lithium Polymer Batteries
- Checkered Grips on the Handheld Transmitter
- Also available in 1-dog unit - Dogtra 1900S
What's in the Dogtra 1902S Box:
- Handheld Transmitter
- slimline Receiver
- 28" Black Collar Strap
- ?" Contact Points
- Universal Charger (110v/ 220v 240v)
- Splitter Cable
- Lanyard
- Metal Belt Clip
- Soft Gear Bag
- 1902S Owner's Manual
Useful Information
View Dogtra 1900S Owner's Manual.
Proper e-collar use
Dogtra e-collars are intended for the sole purpose of behavior modification of dogs. They are not intended for human use or use on other animals. Dogtra Company does not assume any liability for the improper use of a Dogtra e-collar.
Aggressive Dogs
Dogtra highly recommends consulting a dog training professional when using an e-collar to correct dogs that are aggressive towards other dogs or people.
Interference with other electronic devices
Dogtra's industry-leading technology filtering system ensures minimal interference with other electronic devices (garage door openers, mobile phones, etc). Our digital microprocessor offers thousands of unique codes to eliminate frequency match-up with other Dogtra e-collars. Dogtra recommends consulting your physician if you are going to use the e-collar and you have any type of medical devices.
Inadvertent activation
If the constant button is held down for 12 seconds or more, the unit will automatically shut down. It reactivates when the button is released and depressed again.
Proper Fit
A loose fit can allow the receiver/collar to move around on the dog's neck. When this happens, the contact points may rub the skin and cause irritation. If the unit is too loose, the contact points will not make proper contact and your dog will not receive consistent stimulation.
Duration your dog can wear the unit.
Leaving the receiver/collar in the same location on the dog's neck for an extended period of time can cause skin irritation. If the dog is to wear the e-collar for long periods, occasionally reposition the receiver/collar so that the contact points are moved to a different location on the dog's neck. Make sure you check for skin irritation each time you use the unit. If your dog exhibits signs of skin irritation, consult with a veterinarian.
Reaction to the stimulation
Every dog has a different tolerance and reaction to the stimulation. Please look at your dog's reaction to find just the right level of stimulation. The stimulation level may vary depending on the situation and distractions. Normally a distracted dog (chasing another dog, squirrel, etc.) will require a higher level of stimulation compared to when there is no distraction.
Training Methods
E-collars can be used with many different methods. If you have any concerns in the training methods provided by Dogtra, consult with a dog training professional
Understanding your training system
- How to turn the 1900S on/off
- How the transmitter buttons work
- Collar Fitting
- How to find the right stimulation
- To maximize the distance
- The LED indicator
- Green - Fully charged
- Amber - Medium
- Red - Needs charging
- Charging the battery
- Charge the unit before using the unit for the first time.
- Do not charge the batteries near any flammable substances.
- Fully charge the batteries if the unit is to be stored without use for a period of 3 month or more.
- The indicator light on the collar is emitting a red color.
- If the 3 bar indicator on the transmitter LCD shows just 1 bar.
- The indicator light on the transmitter or receiver will not come on. The indicator light on the transmitter or receiver comes on momentarily, but will not stay on when the "Constant" button is pushed.
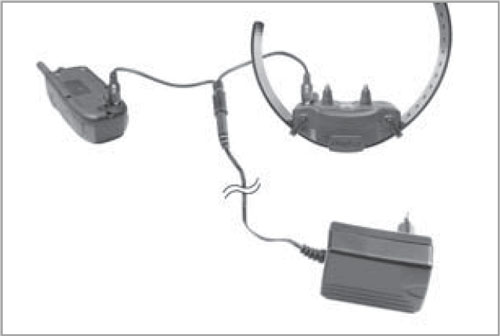
- Attach the charging cables to both the transmitter and receiver
- Plug the charger into a 120-volt wall outlet or if using the accessory field charger, plug into a cigarette lighter only for Lithium-Polymer batteries (use a 230-volt European charger for Europe). When properly plugged in, all indicator lights should glow red. During the charging process, the unit will shut off. Once the battery cable is unplugged from the unit after a full charge, you will need to turn the unit on again before use.
- The Lithium-Polymer battery is fully charged within 2 hours. The lights will star red during the charging process. the red light will change into a steady green light when the battery is fully charged (when you disconnect the charger after finishing the charged, you will need to restart the unit).
- After charging, cover the battery charging receptacles with the rubber plugs on the transmitter and receiver/collar.
- The hand-held transmitter LCD
- Green - Fully charged
- Amber - Medium
- Red - Needs charging
- How to attach the belt clip on the 1900S
- Align the belt clip to the grooves on the back of the transmitter.
- With a firm grip, screw on the belt clip using the provided Phillips head screws.
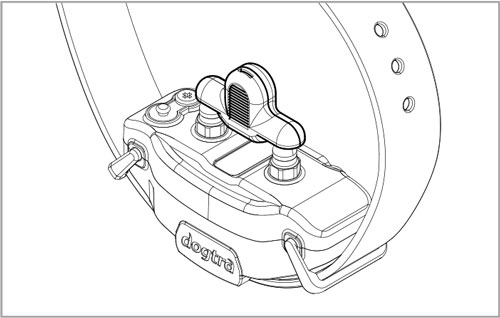
- How to use the test light
- Turn on the receiver/collar and place the test light over the contact points as shown in the diagram.
- The test light will illuminate momentarily when the Nick stimulation button is pressed on the transmitter. The light will stay list as long as the Constant button is pressed on the transmitter, up to 12 seconds.
- When the stimulation is increased, the test light will emit a brighter light.
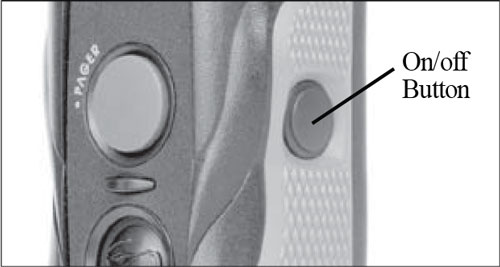
To turn the hand-held transmitter on, hold down the button on the right side of the transmitter until the LCD screen illuminates. To turn the transmitter off, hold down the same button on the right side of the transmitter until the LCD screen shuts off.
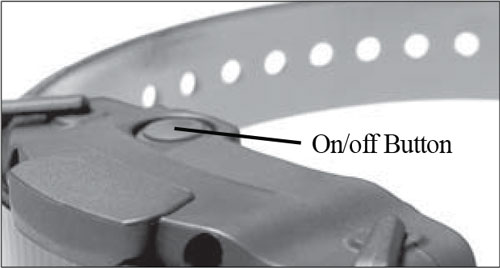
To turn the receiver/collar on, hold down the on/off button until the LED indicator turns green. To turn the receiver/collar off, hold down the on/off button until the LED indicator turns red.
1900S
The transmitter for the 1900S single dog unit has four buttons (one of the face of the transmitter, two on the left side and one on the right side).

Nick Button
The "Nick" button is located on top on the left side of the hand-held transmitter. When the "Nick" button is pressed the receiver emits a single pulse of electrical stimulation.
Constant Button
The "Constant" button is located on the bottom on the left side of the hand-held transmitter. Pressing the "Constant" button gives continuous stimulation as long as the button is pushed, for up to 12 seconds. If the button is not released after 12 seconds, the stimulation will automatically turn off as a safety feature. The collar will be ready to be reactivated once the button has been released.
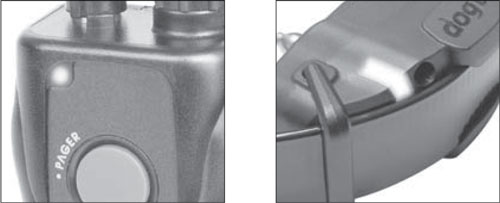
Page Button
The "Pager" button is located on the face of the transmitter. Pressing it will give non-stimulating vibration as long as the button is depressed, for up to 12 seconds.
Transmitter Power ON/OFF
The button on the right side of the transmitter is the "ON/OFF" button that activates the transmitter and LCD screen only. To turn the transmitter on, press the "ON/OFF" button on the right side of the transmitter until the LCD screen illuminates. To turn the transmitter off, press the "ON/OFF" button on the right side of the transmitter. When the LCD screen displays "OFF" release the button.
1902S
The 1902S two-dog unit has five buttons and a toggle switch on the transmitter (two on the face of the transmitter, two on the left side, and one on the right side.).
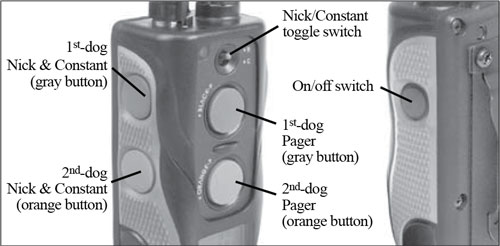
Nick & Constant Toggle Switch
Located on the face of the transmitter is a toggle switch. The toggle switch has a setting for "Nick" and another for "Constant". The color-coordinated buttons (orange for the orange receiver/collar and gray for the black receiver/collar) will implement the desired stimulation based on the toggle switch setting.
When either the orange or gray stimulation button is pressed and the toggle is set on "Nick" the receiver emits a single pulse of electrical stimulation.
When you press either the orange or gray stimulation button, and the toggle is set on "Constant", the receiver emits a continuous stimulation as long as the button is pushed, for up to 12 seconds to the corresponding collar. If the button is not released after 12 seconds, the stimulation will automatically turn off as a safety feature. The collar will be ready to be reactivated once the button has been released.
Pager Button
The Pager button are located on the face of the transmitter. The orange button corresponds with the orange receiver/ collar and the gray with the black receiver/collar. Pressing it will give non-stimulating vibration as long as the button is depressed, for up to 12 seconds.
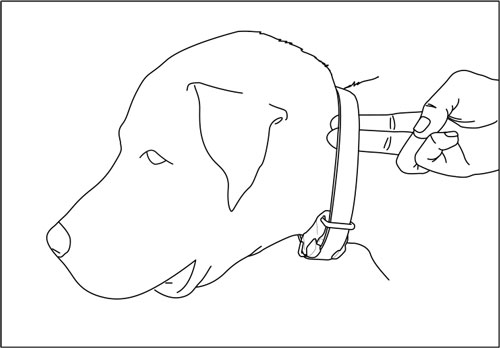
The receiver/collar should be fitted so that the surgical stainless steel contact points press firmly against the dog's skin. When properly fitted, you should be able to fit a finger or two snugly in between the contact points and your dog's skin. When properly fitted, the receiver/collar should not move on the dog. The best location for the receiver/collar box is either side of the dog's windpipe.
A loose fit can allow the receiver/collar to move around on the dog's neck. When this happens, the contact points may rub the skin and cause irritation. If the receiver/collar is to tight, the dogs may have difficulty breathing.
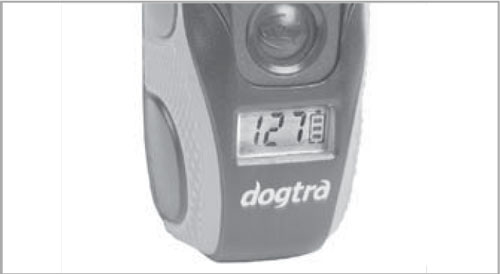
The 1900S comes with the rheostat dial on the transmitter. The rheostat intensity dial controls the stimulation level, with level 0 being the lowest level and level 127 being the highest.
The level of stimulation best suited for your dog depends on your dog's temperament and threshold for stimulation. Always start at the lowest level and work your way up. The appropriate level can be found when the dog responds to the stimulation with a mild reaction, such as a tensing of the neck muscles. The stimulation level may vary depending on the training situation. When highly distracted, dogs will require a higher level of stimulation.
Note: The stimulation intensity can be adjusted even while the stimulations is in use.
The Dogtra 1900S has a 3/4 mile range. The range may vary depending on the way the transmitter is held. Hold the transmitter away from your body to receive the greatest range. For maximum signal strength, keep the Dogtra 1900S properly charged.
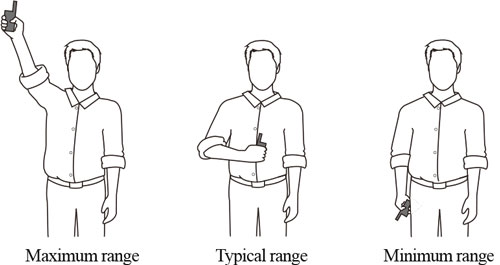
*Avoid touching the antenna or the range may decrease substantially.
The LED indicator flashes every 4 seconds when the receiver is on and ready for use. The LED indicator will blink on both the transmitter and the receiver when the transmitter buttons are pressed.
The LED indicator color indicates the battery life level.
If the unit is used while the LED indicator is red, it will shut down automatically.
Receiver Indicator Light
When the "Constant" button on the transmitter is pushed, the collar indicator light will glow steadily (either green, amber, or red based on the remaining battery life), as long as you hold the button down, for up 12 seconds. When the "Nick" button is pushed, the light comes on for a fraction of a second.
The Dogtra 1900S uses Lithium-Polymer batteries.
Recharge the unit if:
Battery Charging Procedure
NOTE: The unit has a partial charge when it leaves the Dogtra facility, upon receipt of the collar, be sure to give it a full 2-hour initial charge before the first use.
NOTE: Only use Dogtra-approved batteries, charges, and accessories for your Dogtra e-collars. When a charger is not in use, disconnect it from the power source.
Turn the LCD back light on and off with a short press of the on/off button.
The LCD screen indicates the stimulation level (0-127)
The LCD battery life indicator shows 3 bars at full charge, 2 bars at medium charge and 1 bar when it needs to be charged. The battery life indicator only specifies the remaining charge for your transmitter. To find the remaining charge for your receiver, observe the LED indicator on the receiver/collar.
Care for LCD Transmitters in Cold Temperature
In cold temperatures (10 degrees F or below), the Liquid Crystal Display (LCD) on your transmitter may be dim or slow to respond. Wait until the display becomes visible before selecting any training level. Even though the LCD screen might be dim or slow to respond when you push the Nick or Constant button, the transmitter will still function properly. In the occurrence of extremely cold weather, the LCD screen might take a moment to respond causing the intensity level to freeze at that current level. In this situation, if you turn the rheostat intensity dial, the level on the screen may not change but the actual intensity from the receiver/collar will change in agreement with the dial. In this situation, it is ideal to either wait until your transmitter is back to working order before emitting a correction, or while holding the constant button down slowly turn the Rheostat Intensity Dial while watching your dog's reaction. Do not turn the Rheostat Intensity Dial, which might not be correctly reflected on the LCD screen.
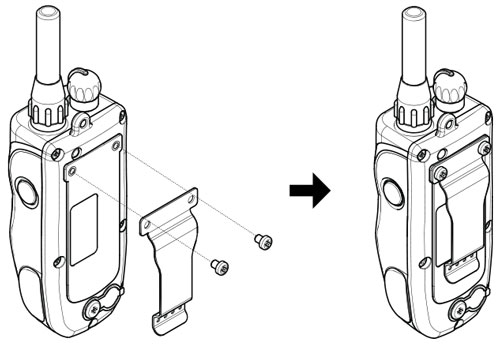
To attach the included belt clip to the transmitter, follow the instructions below.
Caution: Tighten until firmly in place. Be careful not to over tighten.
Maintenance
Basic Maintenance
Be sure the rubber-charging cap is securely in place when the collar is in use. After each training session, carefully inspect the unit for any missing parts or damage to the casing. Damage or broken casing may affect the waterproof guarantee on the unit. After confirming that there is no damage to the casing, rinse the receiver/collar and clean out any dfirt or debris.
Storage Maintenance
The 1900S should be fully charged before storing for extended periods. While in storage, the unit should be given a full charge once a month, and before the first use. Store the nits in room temperature. Do not keep the units exposed to extreme climates.
Troubleshooting
If the unit is malfunctioning, please refer to the "Troubleshooting Guide" before sending it to Dogtra for service. If you have any questions or concerns, yo may email them to info@dogtra.com, or call customer service at 1-888-814-9111.
Troubleshooting Guide
- My dog is reacting to the collar
- Make sure the receiver/collar is turned on.
- Be sure the strap is on the dog tight enough so that both contact points are touching the dog's skin.
- The contact points may be too short for your dog's thick or long coat. To place an order for longer contact points, please contact Dogtra or a Dogtra dealer. If you are already using longer contact points, you may need to trim the hair on the dog's neck, so that both contact points are touching the dog's skin.
- The intensity level may be too low for your dog. Increase the stimulation until the dog responds, Usually by a neck movement, head shaking, or looking over shoulders, The response may be very subtle.
- The LED indicator light comes on, but I do not feel any stimulation.
- Your tolerance may be higher that your dog's. You may need to try the unit on your fingertips where sensitivity is higher and/or increase the stimulation level. Be sure both contact points are touching both of your fingertips.
- The battery may be low, check the LED indicator light on the transmitter and receiver/collar for battery life.
- If you have a full charge, and you have done all of the above, your unit may need to be serviced. Please email us at info@dogtra.com, or call customer service at 1-888-811-911.
- The transmitter has no range, or the stimulation is weaker when my dog is farther away.
- Check to see if your finger are touching the antenna, as the range may decrease substantially.
- The range indicated on the unit's box is for flat terrain (line of sight), Heavy brush, trees, hills, buildings, and/or moisture will affect the range of your unit. For the best range, hold the transmitter vertically above your head, and/or try moving to higher ground.
- Any electrical conductors will affect the range, such as cars, chain-link dog runs, metal buildings, and radio towers. For the best results, operate away from these structures.
- My units are not holding a charge.
- The charging pin may be damaged. A metal pin inside the charging port should stand straight up and firm in the center. If the pin is wobbly, broken or missing, you will need to send the unit in to the repairs department.
- The charging port mus be clean prior to charging, clean out any dirt with a cotton swab and some rubbing alcohol. If your dog was in salt-water, be sure to rinse the receiver and charging port with clean water.
- For Dogtra units over two years old from the purchase date, the batteries may need to be replaced. You can replace them yourself by contacting Dogtra for a replacement battery. Damages incurred to the nit due to improper battery installations are not covered under the warranty. Dogtra strongly recommends sending the unit in for inspection.
- My dog has skin irritation.
- This may be due to an improper fit. If your dog exhibits signs of skin irritation, consult with a veterinarian. Once the dog's skin returns to a normal condition, continue to use the collar and check your dog's neck each time you use the unit.
Customer Reviews
Questions and Answers
 Dogtra 1900S HandsFree E-Collar Remote Training System 3/4 Mile - 1 DogReg price: $570.34 Dogtra 1900S HandsFree E-Collar Remote Training System 3/4 Mile - 1 DogReg price: $570.34Sale price: $438.73 |  Dogtra 1900S WetLands E-Collar Remote Training System 3/4 Mile - 1 DogReg price: $528.09 Dogtra 1900S WetLands E-Collar Remote Training System 3/4 Mile - 1 DogReg price: $528.09Sale price: $406.23 |  Dogtra 280C E-Collar Remote Training System 1/2 Mile - 1 DogReg price: $454.16 Dogtra 280C E-Collar Remote Training System 1/2 Mile - 1 DogReg price: $454.16Sale price: $349.35 |  Dogtra 280C E-Collar Remote Training System 1/2 Mile - 2 DogReg price: $697.09 Dogtra 280C E-Collar Remote Training System 1/2 Mile - 2 DogReg price: $697.09Sale price: $536.23 |