

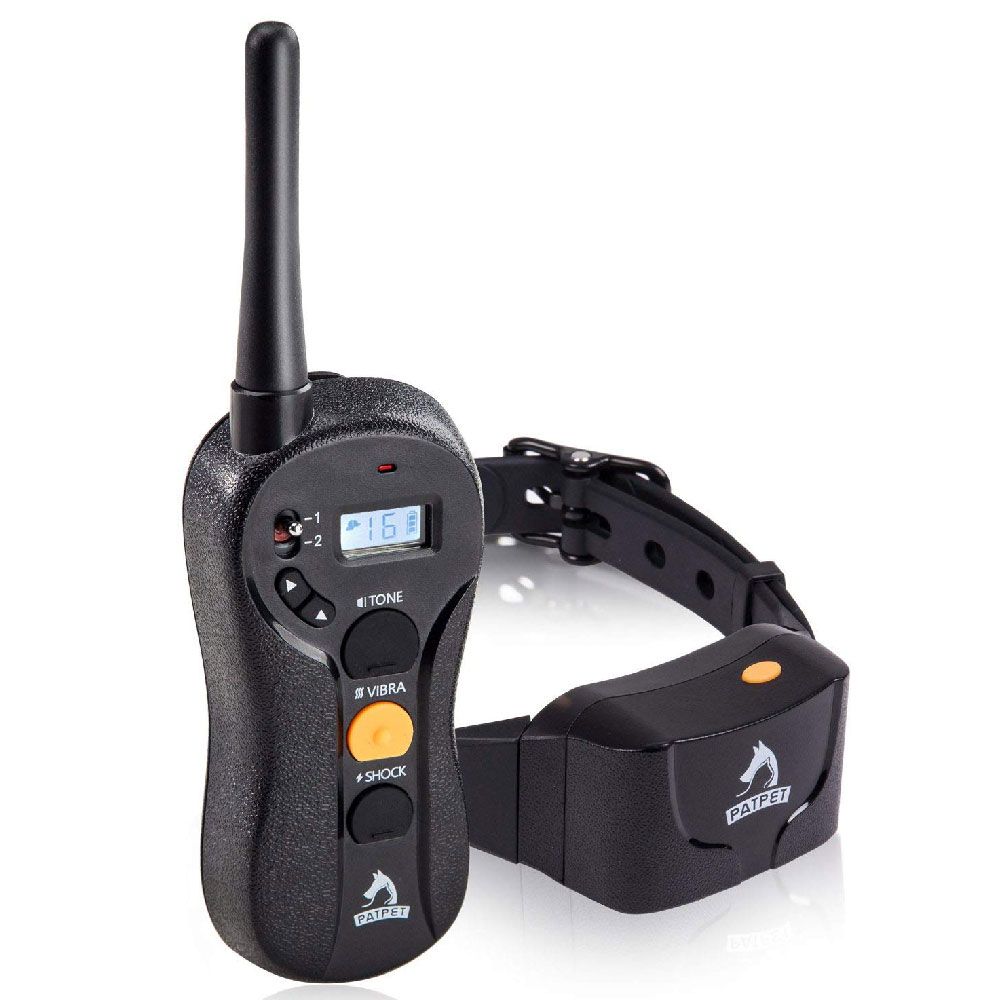


PATPET Dog Training Collar with 1000Yd Remote Control Range
Description
When you expect to improve your dogs behavior by yourself, the PATPET Dog Training Collar with remote is your best choice. This is the professional dog training collar. This shock collar meets all your dog training needs. These training collars are safe, humane, and effective for dogs of all sizes, and breeds to help correct all unwanted dogs behaviors. This e collar for dogs provides 8 adjustable intensity levels for vibration and 16 adjustable intensity levels for shock, and youll find a remarkably safe and effective stimulation that works well for all of your dogs behavior.
The rainproof collar owns ergonomic, backlit screen and simpler format, easy-access button sizes, easier to operate for pet owners, taking effect from standby state immediately without waiting.
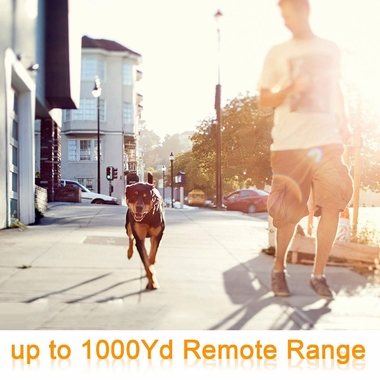
- 600M remote Training Range
- User Expandable to a Two-dog System
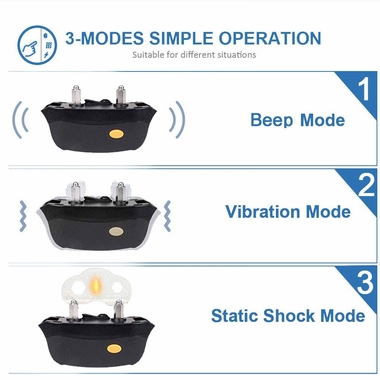
- Tone, Vibration, and Shock Commands
- 16 Adjustable Progressive Intensity Levels for Virbation and Shock
- Blue Backlit LCD Indicating Intensity Level and Battery
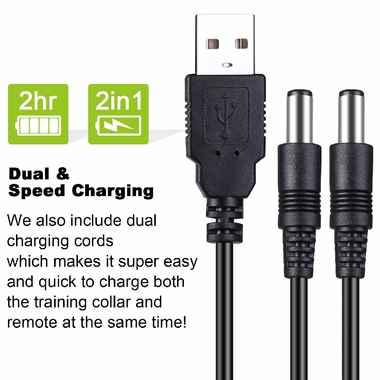
- 2-hour Rapid Chargign Lithium Polymer Battery
- 100% Waterproof
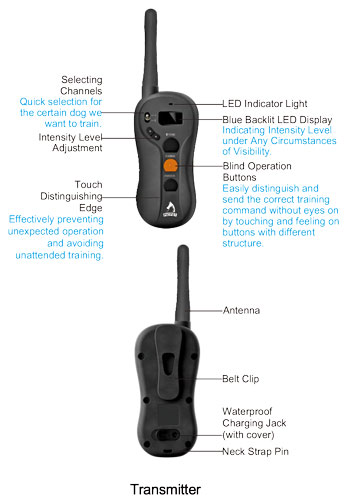
- Innovative Blind Operation with Touch Distinguishing Mode Buttons
Features:
- 1 Receiver
- 1 Remote Transmitter
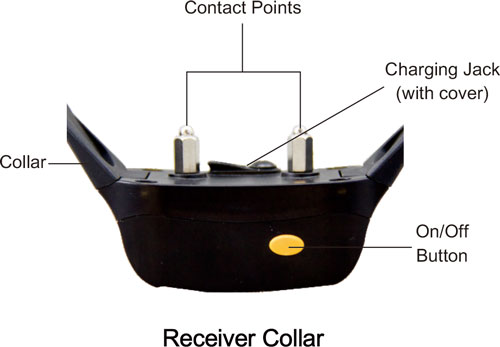
- 4 Contact Points
- 1 Charging Adapter
- 1 USB charging cable
- 1 Neck Strap
- 1 Test Light
- 1 User Manual
- 1 Box
Package Content:
Useful Information
P-C620A Operating & Training Guide
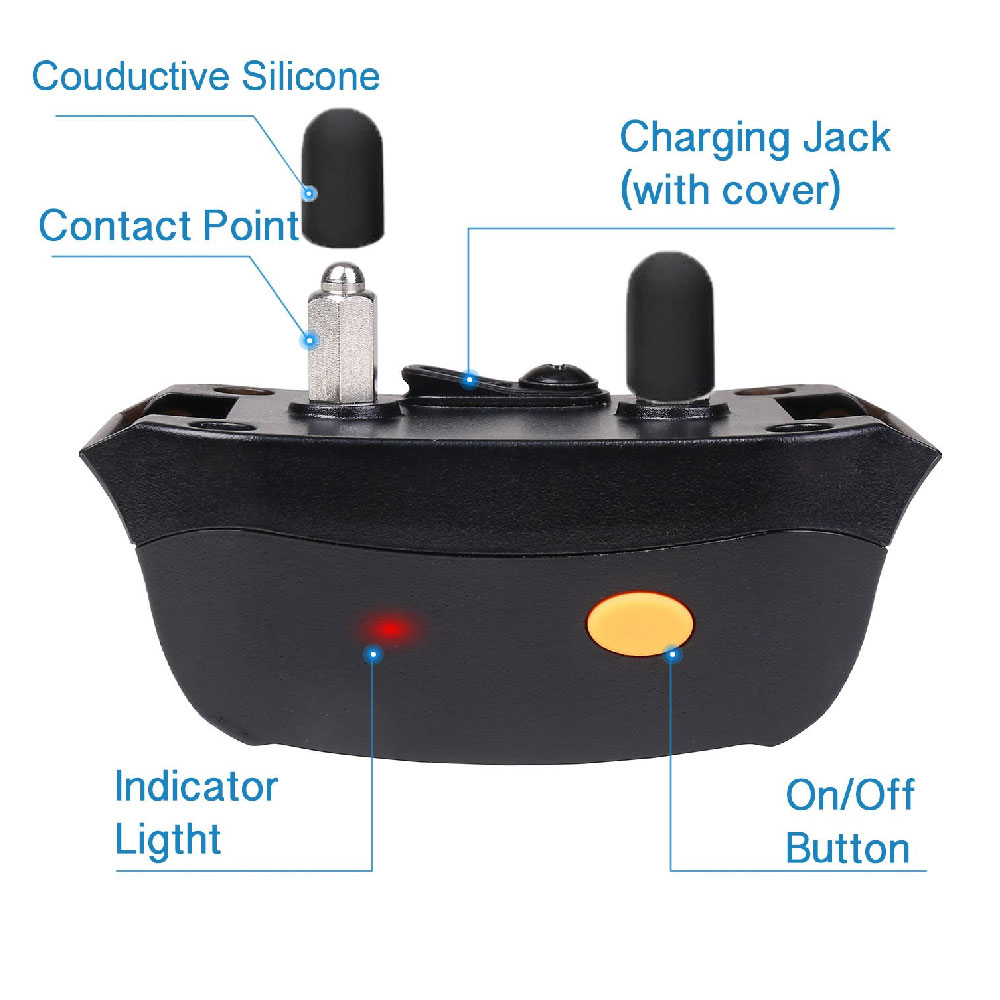
How to turn the p-collar 620 on/off
- To mount the antenna to the corresponding position of the transmitter tightly.
- Press any button on the Transmitter.
- The blue backlight on the display stays on for approximately 30 seconds after a button press. After that with no button press, the blue backlight shuts off first, and if no button press with another five minutes, the display shuts off and the Transmitter goes into battery conservation mode. Pressing any button will turn the display back on.
To turn the Transmitter on
- Press and hold the On/Off Button until the Green LED light comes on. (This takes approximately one second.)
- Release the On/Off Button. In normal mode, the Green LED will flash once every 5 seconds, indicating the Receiver Collar is on and ready to receive a signal from the Handheld Transmitter.
To turn the Receiver Collar on
- Press and hold the On/Off Button until the Red LED light shuts off. (This takes approximately three seconds.)
- Release the On/Off Button.
To turn the Receiver Collar off
Note: To extend the life of the batteries, turn the Receiver Collar off when it is not in use.
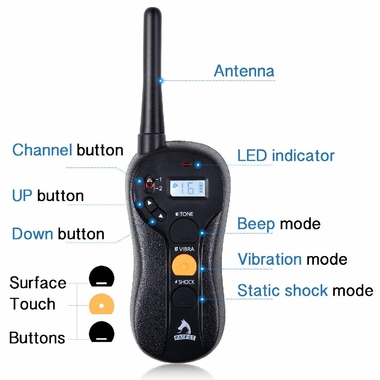
How the Transmitter buttons work
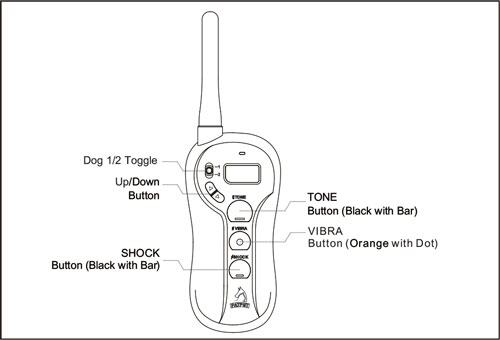
Tone Only Button (Black with Bar): Sends an audible tone to the collar. No stimulation is delivered. Vibration Only Button ((Orange with Dot)/Sock Only Button (Black with Bar):
Delivers vibration/shock through the Contact Points on the Receiver Collar at the level shown on the Digital Display. When held down for 10 consecutive seconds, the Transmitter will "time-out", and vibration/shock cannot be delivered for 5 seconds. you must release and press the button again after the 5 second time-out period, before additional vibration/shock can be delivered.
- Vibra/Shock Up Button (): Increases vibration/shock Level by 1.
- Vibra/Shock Down Button (): Decrease vibration/shock Level by 1.
Dog 1/2 Toggle Switch Located on the upper left face of the Transmitter is a toggle switch, allowing switch between Dog 1 and Dog 2.
Collar fitting
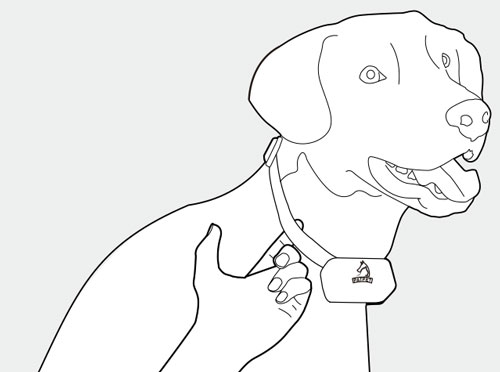
The Receiver/Collar should be fitted so that the surgical stainless steel contact points press firmly against the dog's skin. When properly fitted, you should be able to fit a finger or two snugly in between the collar and your dog's skin. When properly fitted, the Receiver/Collar should not move on the dog. The best location for the Receiver/Collar box is either side of the dog's windpipe.
A loose fit can allow the Receiver/Collar to move around on the dog's neck. When this happens, the contact points may rub the skin and cause irritation. If the Receiver/Collar is too tight, the dogs may have difficulty breathing.
How to find the best Vibration/Shock Level
The unit comes with Up and Down buttons to control the Vibration/Shock Level, with Level 1 being the lowest level and Level 16 being the highest.
The level of Vibration/Shock best suited for your dog depends on your dog's temperament and threshold for Vibration/Shock. Always start at the lowest level and work your way up.
The appropriate level can be found when the dog responds to the Vibration/Shock with a mild reaction, such as a tensing of the neck muscles. The Vibration/Shock Level may vary depending on the training situation. When highly distracted, dogs will require a higher level of Vibration/Shock.
To maximize the distance
The unit has 600 meter range. The range may vary depending on the way the Transmitter is held. Hold the transmitter away from your body to receive the greatest range. For maximum signal strength, keep the device properly charged.
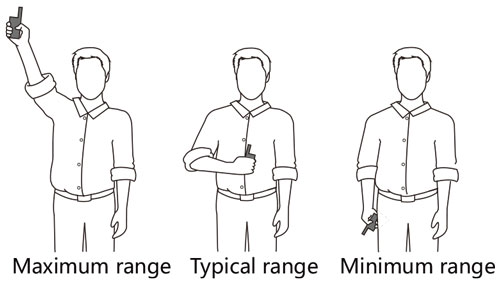
Avoid touching the Antenna or the range may decrease substantially.
Charging the battery
- Charge the unit before using the unit for the first time.
- Do not charge the batteries near any flammable substances.
- Fully charge the batteries if the unit is to be stored without use for a period of 3 months or more.
The unit uses Lithium-Polymer batteries.
- The indicator light on the collar is emitting a red color and flashes rapidly.
- The 3 bar indicator on the Transmitter LCD shows just 2 bar.
- The indicator light on the Transmitter or Receiver will not come on.
- The indicator light on the Transmitter or Receiver comes on momentarily when any of the Mode Buttons is pushed.
Recharge the unit if:
- Lift the rubber covers protecting the Transmitter/Receiver Collar Charging Jack.
- Connect the charger connectors to the Transmitter and Receiver Collar Charging Jack, and as shown below.
- Connect the USB port to the Charging Adapter.
- Plug the charger into a standard wall outlet.
- Charge the unit for 4 hours for the first charge. Recharges take only 2-3 hours.
- When charging is completed, remove the charger connector.
Battery Charging Procedure
Note: The unit has a partial charge when it leaves our facility, upon receipt of the collar, be sure to give it a 4-hour initial charge before the first use.
Note: The Battery Indicator on the Transmitter will scroll and the indicator light in steady red while changing; and the Battery Indicator will become steady, and the LED Indicator Light flashes when fully charged.
The indicator light on the Receiver Collar will be in steady red while charging and green light turned on when fully charged.
How to pair the Remote Transmitter & Receiver Collar
If your Receiver Collar does not beep when the TONE Button of the Remote Transmitter is pushed, or if you feel the Receiver Collar is not responding to the Remote Transmitter, follow these steps to pair:
- With the Receiver Collar off your pet, turn the Receiver Collar off. Restart, press and hold the On/Off Button until the Green LED flashes every second on the Receiver Collar. This continues for 16 seconds, within which pairing should be completed.
- Press and hold the TONE and VIBRA Button of the Remote Transmitter at the same time until the Green LED Light on the Receiver Collar flashes rapidly for 5 times, indicating pairing is completed.
- Set the Toggle Switch to 2.
- Turn on the Receiver Collar for Dog 2, press any Mode Buttons to verify function.
- If Dog 2 Receiver Collar does not respond. Pairing may be needed, Repeat steps in How to pair the Remote Transmitter & Receiver Collar above.
Two Dog System
NOTE: If you wish to add another Receiver Collar to the training system, extra Receiver Collars are available where your bought your unit.
Remote Transmitter
How to use the Test Light
- Turn the Receiver Collar on.
- Hold the Test Light Contacts to the Contact Points.
- Press the SHOCK Button on the Remote Transmitter.
- The Test Light will flash
- Turn the Receiver Collar off.
Note: At higher Shock Levels, the Test Light will flash brighter.
Save the Test Light for future testing.
Note: If the Test Light does not flash, recharge the Receiver and re-test. If Test Light still does not flash, contact s for Customer Service.
Training Guide
- Eliminate one misbehavior or teach one obedience command at a time. If you move too fast with training, your pet may become confused.
- Be consistent. Correct your pet every time he misbehaves.
- Unless you can supervise him, it is recommended that you restrict your pet from situations in which he has a history of misbehaving. However, setting up a situations as a training session can dramatically improve your chances of success.
- If your pet reacts to the tones by hiding or acting fearful, redirect his attention to a simple and appropriate behavior, such as the "sit" command.
- Pets should be at least 6 months old before using the Training Collar.
- Only let responsible family members use the Training Collar. It is not a toy!
- Other pets in hearing range will be affected by the training tones. Therefore, training sessions should be conducted out of hearing range of other pets.
General Tips
WARNING: Never use the Remote Training Collar to correct or eliminate any form of aggressive behavior. We recommend you contact your local veterinarian or professional trainer to determine if your pet might be aggressive.
FAQs
Is the Vibration/Shock safe for my pet?
While the Vibration/Shock is unpleasant, it it harmless to your pet. Electronic training devices require interaction and training from the owner to achieve desired results.
How old does my pet have to be before using the Remote Training Collar?
Your pet should be able to recognize basic obedience commands such as "Sit" or "Stay" Pets should be at least 6 months old before using the Training Collar.
Once my pet is trained and has been obeying my commands, will he have to continue to wear the Receiver Collar?
Probably not. You may need to reinforce training with the Receiver Collar from time to time.
Is the Receiver Collar waterproof? yes
Will I get exactly 600 meters of range with the Remote Training Collar?
The range of the Remote Training will vary according to terrain, weather, vegetation, as well as transmission from other radio devices. See "To maximize the distance" for tips on maximizing your range.
How long can I continuously deliver Vibration/Shock to my pet?
The maximum amount of time you can press the Vibration/Shock Button and deliver Vibration/Shock to your pet continuously is 10 seconds. After this, there's a time-out and Vibration/Shock cannot be delivered for 5 seconds. After the 5 second time-out period, Button can be pressed and Vibration/Shock can be delivered again.
Troubleshooting
- Make sure the Receiver Collar has been turned on.
- If your range has reduced from the first time you used be low in either the Remote Transmitter or Receiver Collar.
- Terrain, weather, vegetation, transmission from other radio devices and many other factors can impact the amount of range you have with the unit.
- test the Receiver Collar. See "How to use the Test Light" for details.
- Increase the Vibration/Shock Level. Refer to "How to find the best Vibration/Shock Level" for more information.
- Make sure the Receiver Collar's Contact Points are placed snugly against your pet's skin. Refer to "Collar fitting" for more information.
My pet does not respond when I press a button.
- Make sure the Receiver Collar has been charged. For the initial charge, be sure to charge it for 4 hours. Subsequent charges only take 2-3 hours.
The Receiver Collar will not turn on.
- Verify the Receiver Collar is on.
- If the Indicator Light does not come on when any button is pressed on the Transmitter, ensure that the batteries are fully charged.
- If the first two solutions did not resolve our problem, see "How to pair the Remote Transmitter & The Receiver Collar".
The Receiver Collar is not responding to the Remote Transmitter.
Customer Reviews
Questions and Answers
 PATPET Dog Shock Collar with 1000 ft Remote Control RangeReg price: $35.99 PATPET Dog Shock Collar with 1000 ft Remote Control RangeReg price: $35.99Sale price: $26.99 |  PATPET Dog Training Collar with 300m Remote Control RangeReg price: $25.99 PATPET Dog Training Collar with 300m Remote Control RangeReg price: $25.99Sale price: $19.99 |