


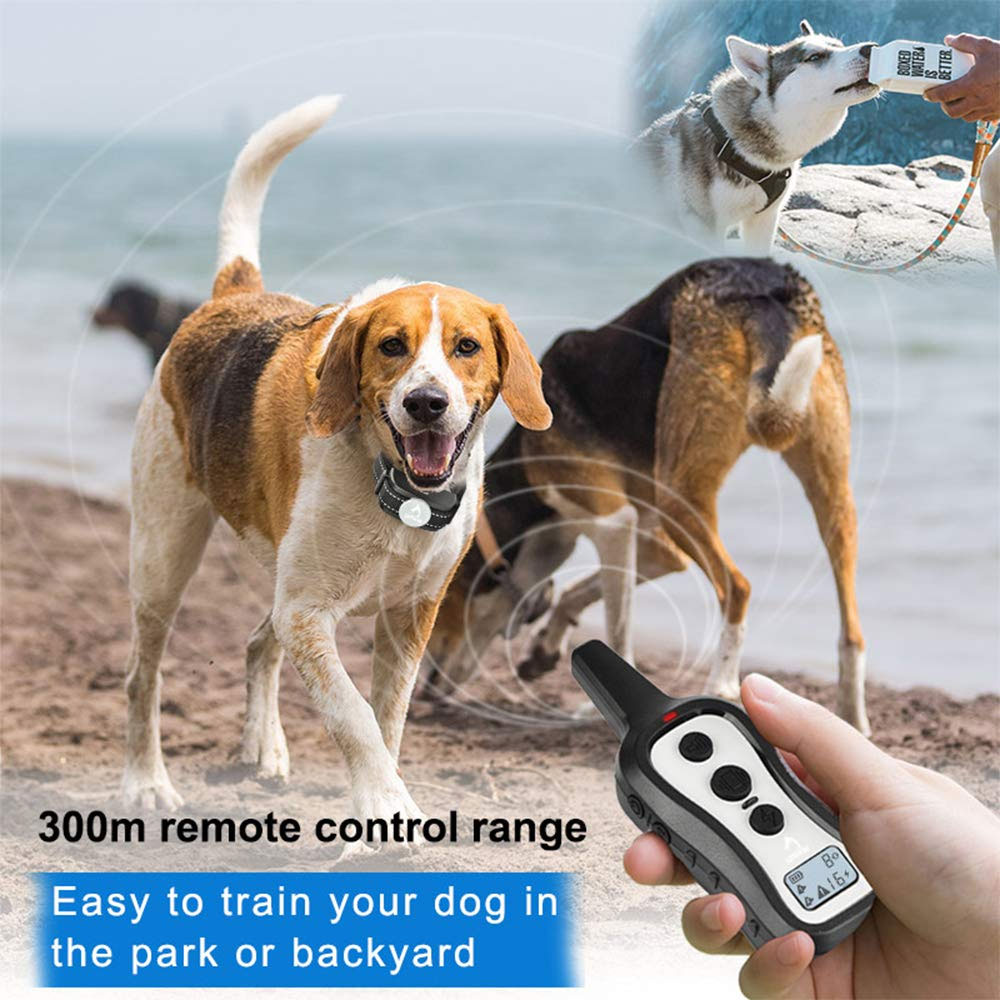


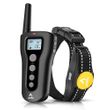
PATPET Dog Training Collar with 300m Remote Control Range
Description
When you expect to improve your dogs behavior by yourself, the PATPET Dog Training Collar with remote is your best choice. This is the professional dog training collar. This shock collar meets all your dog training needs. These training collars are safe, humane, and effective for dogs of all sizes, and breeds to help correct all unwanted dogs behaviors. This e collar for dogs provides 8 adjustable intensity levels for vibration and 16 adjustable intensity levels for shock, and youll find a remarkably safe and effective stimulation that works well for all of your dogs behavior.
The rainproof collar owns ergonomic, backlit screen and simpler format, easy-access button sizes, easier to operate for pet owners, taking effect from standby state immediately without waiting.
- 3 Training Modes
- IPX4 Rainproof
- Expandable for 2 Dogs
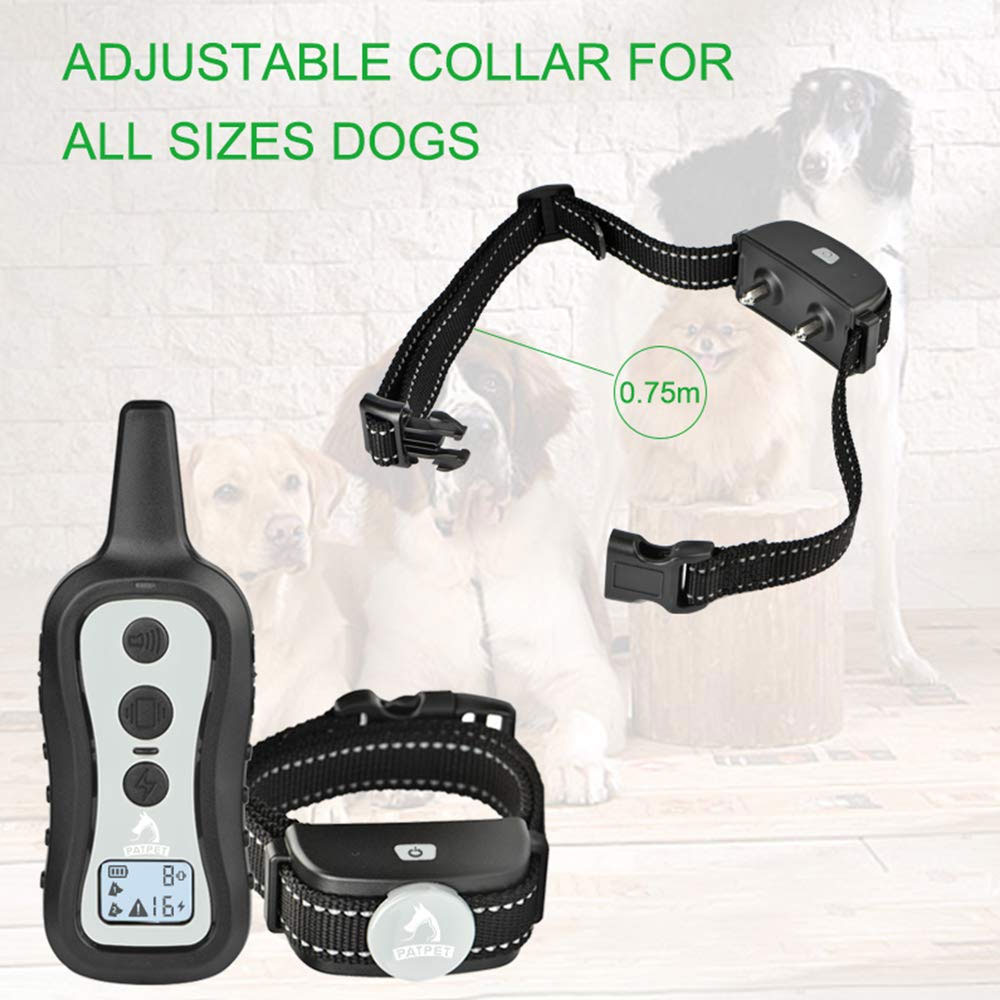
- Adjustable Collar for all sizes Dogs
Features:
- 1 Receiver Collar
- 1 Collar
- 1 Remote
- 4 Contact Points
- 4 Conductive silicone
- 1 Test Light
- 1 User Manueal
- 4 Battery
- 1 Wrist Strap
- 1 User Manual
- 1 Box
Package Content:
Useful Information
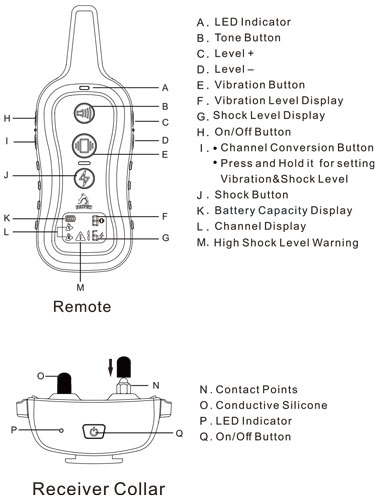
P-C301 Operating & Training Guide
- Prepare the Remote - install batteries and turn it on.
- Prepare the Receiver collar - install batteries, Contact Points, Conductive Silicone, and assembly collar, turn the Receiver Collar on.
- Function-test - test function of buttons before wearing it on dog.
- How to Use the Test Lamp - use the Test Lamp to test Shock function or use as a screw driver.
- Pair the Remote and the Receiver Collar - Pair them when the product lose its code or pair for a second collar.
Before you can use the Dog Training Collar, you must set up the product as below steps:
Prepare the Remote
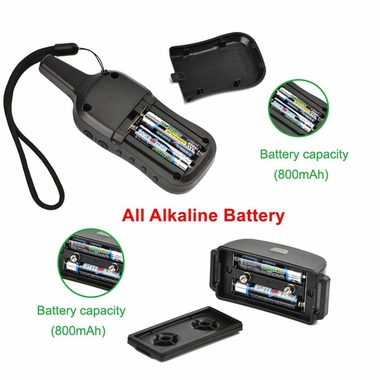
- Push out the battery cover to remove it (1A).
- Install the battery according to the engraved mark, negative(-) first, positive(+) next (1B).
- Install the battery cover on the Remote (1C).
Install battery on the Remote

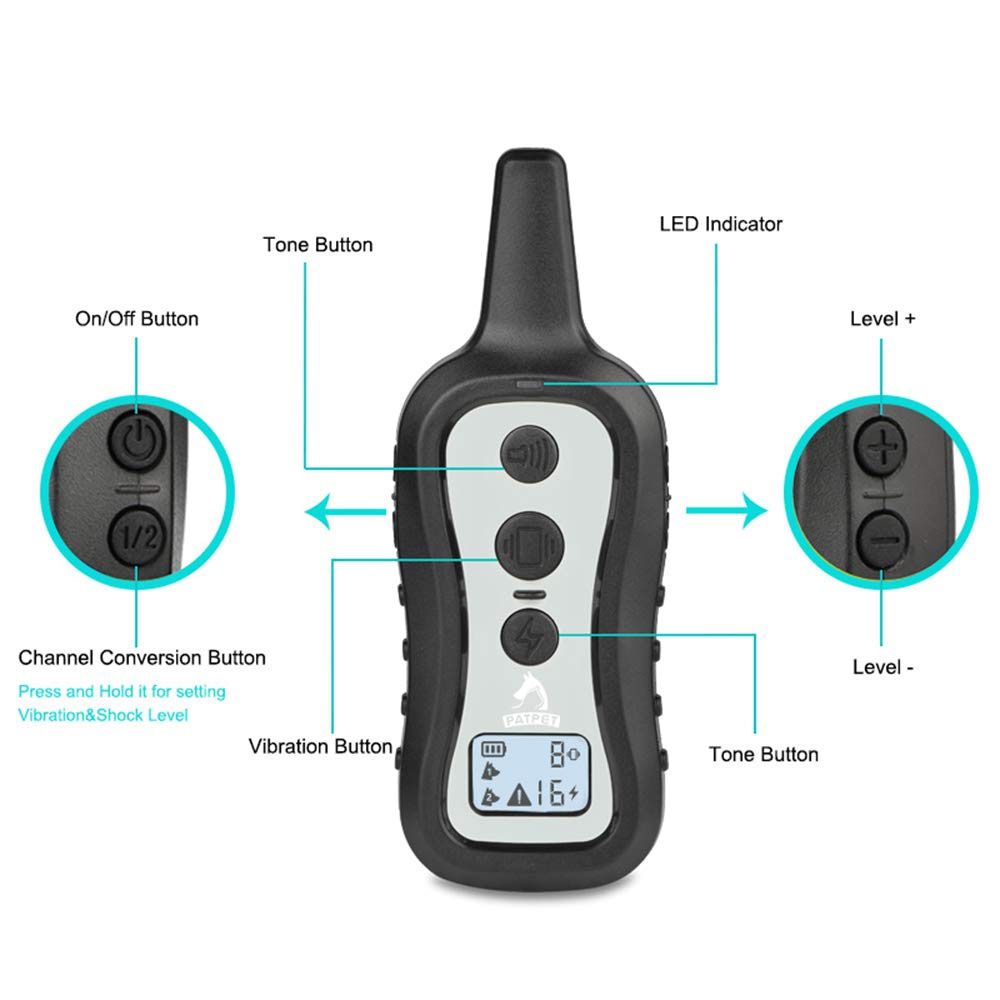
- Press the ON/OFF Button on the Remote once to turn it ON.
- LCD will be lighted, and show the information of current channel, battery power and levels. If not, please check the batteries position or change new batteries.
- Press and hold the ON/OFF Button on the Remote to turn it OFF until the LCD off, then release. It may take 2-3 seconds.
Turn ON/OFF Remote
Note: In the state f power-on, the LCD display will appear when any buttons is pressed.
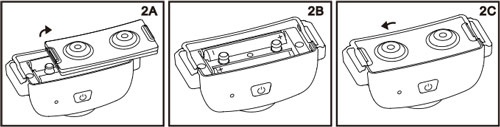
Prepare the Receiver
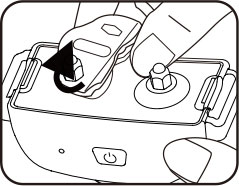
- Push out the battery cover to remove it (2A).
- Install the battery according to the engraved mark, negative(-) first, positive(+) next (2B).
- Install the battery cover on the Receiver Collar (2C).
Install battery on the Receiver
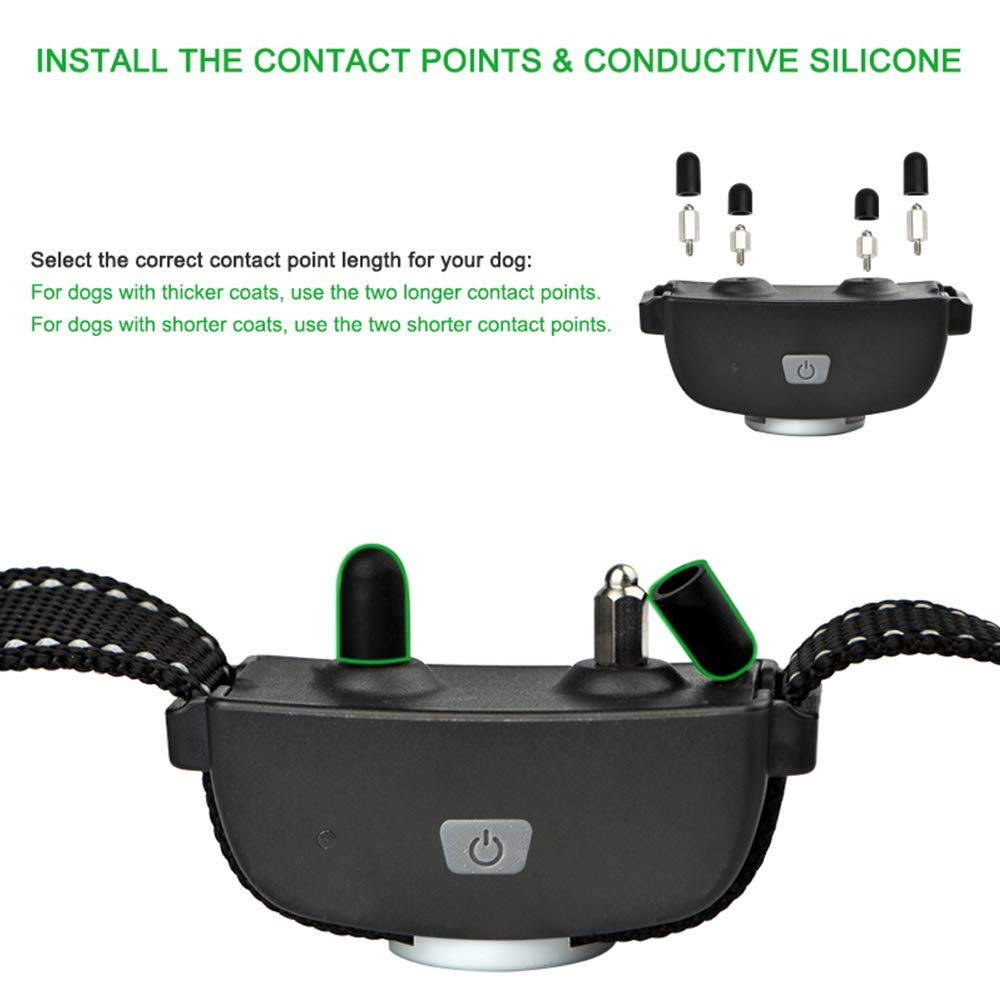
- Select the correct Contact Points Conductive Silicone Length for your dog's coat type:
- For dogs with thicker coats, Use 2pcs longer Contact Points and Conductive Silicone.
- For dogs with shorter coats, Use 2pcs shorter Contact Points and Conductive Silicone.
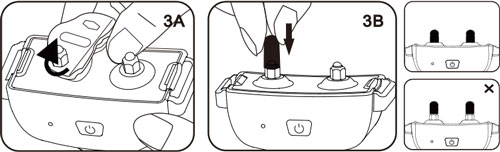
- Insert the Contact Points into the ports of the collar, use the Test Lamp to rotate clockwise to tighten them (3A).
- Install the Conductive Silicone onto the Contact Points to make it softer, it may be better to the dog's skin (3B).
Install the Contact Points & Conductive Silicone
Note: Not install the Metal Contact Points when shock function is not be used.
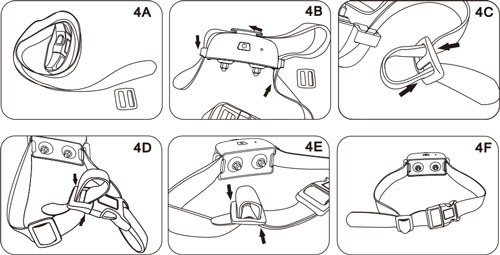
- Unhitch the nylon belt and take off the Slide Buckle (4A).
- Thread the strap through the Receiver Collar (4B).
- Thread the slide buckle through the strap (4C).
- Thread the strap through the side release buckle (4D).
- Thread the excess strap through the slide buckle to make sure the collar is secured tightly (4E).
Assembly Collar
- Press the On/Off Button the Green LED light comes on.
- In normal mode, the Green LED will flash every 4 seconds, indicating the Receiver Collar is on and ready to receive a signal from the Remote.
Turn on the Receiver Collar
- Press and hold the On/Off Button until the Red LED lights shuts off (this takes approximately 3 seconds).
- Release the On/Off Button.
Turn off the Receiver Collar
Note: To extend the life of the batteries, please turn the Receiver Collar off when it is not in use. remove the battery if not use for a long time.
Function Test
We recommend you experience first and how the different levels feel on yourself and always begin at the lowest level, and increase the levels up to your personal comfort levels.
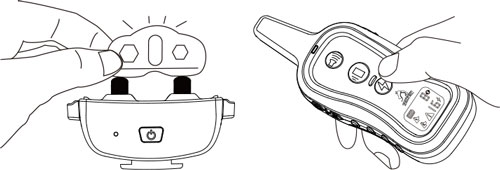
- Place one finger over both contact points of the training collar.
- Hold your remote approximately 2 ft. from the training collar. Press the Vibration Button continuously for 1 to 2 seconds. You should feel continuous vibration.
- Press and hold 1/2 until the Shock Level display flashes, press +/- to increase/decrease levels. Starting at level 1, press the Shock Button.
- Increase the level until the sensation begins to feel uncomfortable.
Note: Continuous stimulation will transmit for no more than 10 continuous seconds. To reactivate, release and repress the button.
- Press and hold 1/2 until the Vibration/Shock Level display flashes to set Vibration/Shock Level.
- The Shock Level can be adjusted from 1 to 16 levels and the Vibration Level from 1 to 8 levels; please adjust it properly as per your dog's reaction.
- It is not recommended to press and hold the Vibration/Shock Button too long to avoid physical or psychological hurt to the dog.
Note:
How to Use the Test Lamp
- Turn on the Receiver Collar.
- Hold the Test Lamp contacts against the Contact Points (or Conductive Silicone).
- Press the Shock Button and the Test Lamp will be lighted. It will be lighter accordingly with the Shock Level increasing.
Shock Function Test
As a Screw Driver
Use the Test Lamp to tighten or loosen the Contact Points when prepare the Receiver Collar
- Use the Dog 1/2 Button on the Remote to select Dog 1
- With the Remote turned on and the Receiver Collar turned off, press and hold the ON/OFF Button on the Receiver collar for 4-5 seconds.
- The Red & Green LED will blink for about 10 seconds indicating that it is ready for pairing.
- Press and hold the first Tone Button and the second Vibration Button at the same time for 2-3 seconds, the Green Led on the Receiver Collar will blink for 5 times indicating successful pairing.
Pair the Remote and the Receiver Collar
- Use the Dog 1/2 Button on the Remote to select Dog 2. Then follow the above pairing steps from 2-4.
Pair the Remote and the Receiver Collar
Dog Training
- For dogs with thicker coats, Use 2pcs Contact Points and Conductive Silicone.
- For dogs with shorter coats, Use 2pcs shorter contact Points and Conductive Silicone.
Selecting The Contact Points and The Conductive Silicone
For the best results, select the correct Contact Points based on your dog's coat.
Fit the Training Fitting
- Too Loose: The Receiver Collar will move around the dog's neck, the Contact Points may hurt the dog's skin.
- Too Tight: It may cause dog's to breathe hard.
- Caution:
- Do not shave the pet's neck as this may increase the risk of skin irritation.
- The collr should not be worn for more than 12 hours per day. Or it may cause skin irritation.
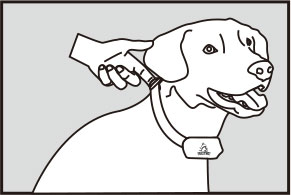
Please fit the collar properly so that the Contact Points press firmly against the dog's skin. When properly fitted, you should be able to put a finger in between the Receiver Collar and dog's neck.
Find the Best Shock Level for Your Pet
The unit comes with Up and Down buttons to control the Shock Level, with Level 1 being the lowest level and Level 16 being the highest. The level of Shock best suited for your dog depends on your dog's temperament and threshold for Shock. Always start at the lowest level and work your way up. The appropriate level can be found when the dog responds to the Shock with a mild reaction, such as a flick of the ear, a lick of the lips, a tensing of the neck muscles etc. The Shock Level may vary depending on the training situation. When highly distracted, dog's will require a higher level of Shock.
- The indicator light on the Receiver Collar is emitting a red color every 4 seconds or flashes rapidly
- The 3 bar indicator on the Remote LCD shows just 1 bar.
- The indicator light on the Remote or Receiver Collar will not come on.
- The indicator light on the Remote or Receiver Collar comes on momentarily when any of the Mode Buttons is pressed.
The unit need to be charged under any of below situations
FAQs
Is the Vibration/Shock safe for my pet?
While the Vibration/Shock is unpleasant, it is harmless to our pet. Electronic training devices require interaction and training from the owner to achieve desired results.
How old does my pet have to be before using the Remote Training Collar?
Your pet should be able to recognize basic obedience commands such as "Sit" or "Stay" Pets should be at least 6 months old before using the Training Collar.
Once my pet is trained and has been obeying my commands, will he have to continue to wear the Receiver Collar?
Probably not. You may need to reinforce training with the Receiver Collar from time to time.
Is the Receiver Collar water resistant? Yes
Will I get exactly 984 feet of range with the Remote Training Collar?
The range of the Remote Training will vary according to terrain, weather, vegetation, as well as transmission from other radio devices.
How long can I continuously deliver Vibration/Shock to my pet?
The maximum amount of time you can press the Vibration/Shock Button and deliver Vibration/Shock to your pet continuously is 10 seconds. After this, there's a time-out an Vibration/Shock cannot be delivered for 5 seconds. After 5 second time-out period, Button can be pressed and Vibration/Shock can be delivered again.
Troubleshooting Guide
- Make sure the Receiver Collar has been turned on.
- If your range has reduced from the first time you used the Remote Training Collar, the battery(s) may be low in either the Remote or Receiver Collar.
- Terrain, weather, vegetation, transmission from other radio devices and many other factors can impact the amount of range you have with the unit.
- test the Receiver Collar. See "How to use the Test Lamp" for details.
- Increase the Shock Level. Refer to "find the Best Shock Level for Your Pet" for more information.
- Make sure the Receiver Collar's Contact Points are place snugly against your pet's skin. Refer to "Fit the Training Collar" for more information.
My pet does not respond when I press a button.
- Check that the two LR03/AAA batteries have been installed properly See "Install battery on the Receiver".
The Receiver Collar will not turn on.
- Make sure the Receiver Collar is on.
- If the indicator Light does not come on when any button is pressed on the remote, ensure that the batteries are inserted properly.
- If the first two solutions did not resolve your problem, see "Pair the remote and the Receiver Collar".
The Receiver Collar is not responding to the Remote.
Customer Reviews
Questions and Answers
 PATPET Dog Shock Collar with 1000 ft Remote Control RangeReg price: $35.99 PATPET Dog Shock Collar with 1000 ft Remote Control RangeReg price: $35.99Sale price: $26.99 |  PATPET Dog Training Collar with 1000Yd Remote Control RangeReg price: $53.99 PATPET Dog Training Collar with 1000Yd Remote Control RangeReg price: $53.99Sale price: $40.99 |